Exposing MQTT (or other services) on MicroK8S on a home network
February 12, 2022
MicroK8S is the most user friendly kubernetes distribution I have found for home use. I have been looking for a simple guide on how to expose services on a single node microk8s cluster to the rest of the home network and I didn’t find any. So I have put together this guide which I hope might be useful.
Step 1
Enable MetalLb loadbalancer on microk8s.
microk8s enable metallbThis will prompt for a range of IP addresses as below. I entered the ip address range 192.168.10.128-192.168.10.250
You can essentially select any of the private IP address ranges
(except the home router’s IP address range). My regular home network uses the 192.168.1.20-192.168.1.254 IP range, so I chose a different range here.
Enabling MetalLB
Enter each IP address range delimited by comma (e.g. '10.64.140.43-10.64.140.49,192.168.0.105-192.168.0.111'): 192.168.10.128-192.168.10.250
Applying Metallb manifest
namespace/metallb-system created
...
Step 2
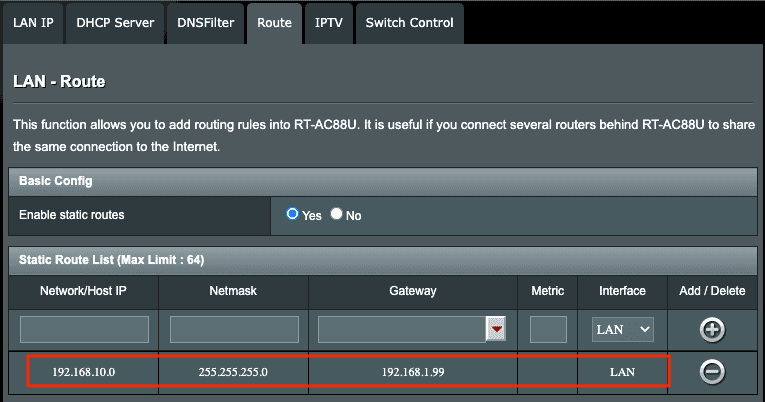
Add the ip address range for the metallb load-balancer to your router’s routing table. This makes it possible for the home router to pass any traffic destined for load balancers ip range via the microk8s host. For example for my Asus router it looks like following.
Step 3
Deploy mqtt as a service on microk8s using kubectl, pay special attention to how the service section of the yaml is configured below.
kubectl appply -f mqtt-lb.yamlHere is the contents of mqtt-lb.yaml
apiVersion: apps/v1
kind: Deployment
metadata:
  name: mosquitto
  namespace: default
spec:
  replicas: 1
  selector:
    matchLabels:
      name: mosquitto
  template:
    metadata:
      labels:
        name: mosquitto
    spec:
      containers:
        - name: mosquitto
          image: eclipse-mosquitto:2.0.12
          ports:
          - containerPort: 1883
          volumeMounts:
          - name: mosquitto-config
            mountPath: /mosquitto/config/mosquitto.conf
            subPath: mosquitto.conf
      volumes:
      - name: mosquitto-config
        configMap:
          name: mosquitto-configmap
---
apiVersion: v1
kind: ConfigMap
metadata:
  name: mosquitto-configmap
  namespace: default
data:
  mosquitto.conf: |-
    listener 1883
    allow_anonymous true
---
apiVersion: v1
kind: Service
metadata:
  name: mosquitto-service
  namespace: default
  annotations:
    metallb.universe.tf/address-pool: default # <-- Which MetalLB IP pool to use
spec:
  type: LoadBalancer # <-- Changed
  selector:
    name: mosquitto
  ports:
    - name: mosquitto
      protocol: TCP
      port: 1883
      targetPort: 1883
      # nodePort: 30007  <--- Not required
  loadBalancerIP: 192.168.10.128
By default MQTT runs on port 1883 and I have kept the default here.
Take note of the following in kubernetes service defintion:
-
type: LoadBalancerin service config
-
protocol: TCPMQTT protocol is not built on HTTP/S and hence need to be exposed as a raw TCP service (it’s not possible to use nginx ingress controller due to this)
-
metallb.universe.tf/address-pool: defaultYou will need to find out under which address pool name the IP address range you entered when configuring MetalLB is known. See Note 1 below.
-
loadBalancerIP: 192.168.10.128This will ensure metallb will allocate the same IP from the range if the service is redeployed for some reason. More information about requesting a specific IP.
Step 4
Now you need to find out which IP address from the range you supplied was used for MQTT. This could be done by inspecting the services in the cluster.
This could be obtained via kubectl get services -n default which will list all the services with their cluster IP as well as external IP. It produces
the following output for me.
NAME                TYPE           CLUSTER-IP       EXTERNAL-IP      PORT(S)          AGE
kubernetes          ClusterIP      10.152.183.1     <none>           443/TCP          73d
mosquitto-service   LoadBalancer   10.152.183.98    192.168.10.128   1883:32343/TCP   9h
Look at the column EXTERNAL-IP in above table. This is the ip address via which MQTT can be accessed.
Note 1 - finding the address pool name in metallb
Usually metallb is deployed under it’s own namespace metallb-system when configured via microk8s.
kubectl describe configmap/config -n metallb-systemThis will print something like
Name:         config
Namespace:    metallb-system
Labels:       <none>
Annotations:  <none>

Data
====
config:
----
address-pools:
- name: default
  protocol: layer2
  addresses:
  - 192.168.10.128-192.168.10.250
Check the ip address range you entered and which name it’s assigned.
References
Written by Francois Fernando, a software craftsman and tinkerer.