Home Assistant Energy Monitor Dashboard
January 05, 2026
Home Assistant is probably the best open source home automation/monitoring solution out there. Following guide explains How I put together my Home Assistant based energy monitoring dashboard. We have a FoxESS battery storage solution at home and this allows us to monitor the battery charge levels and other aspects of energy generation/usage at our home.
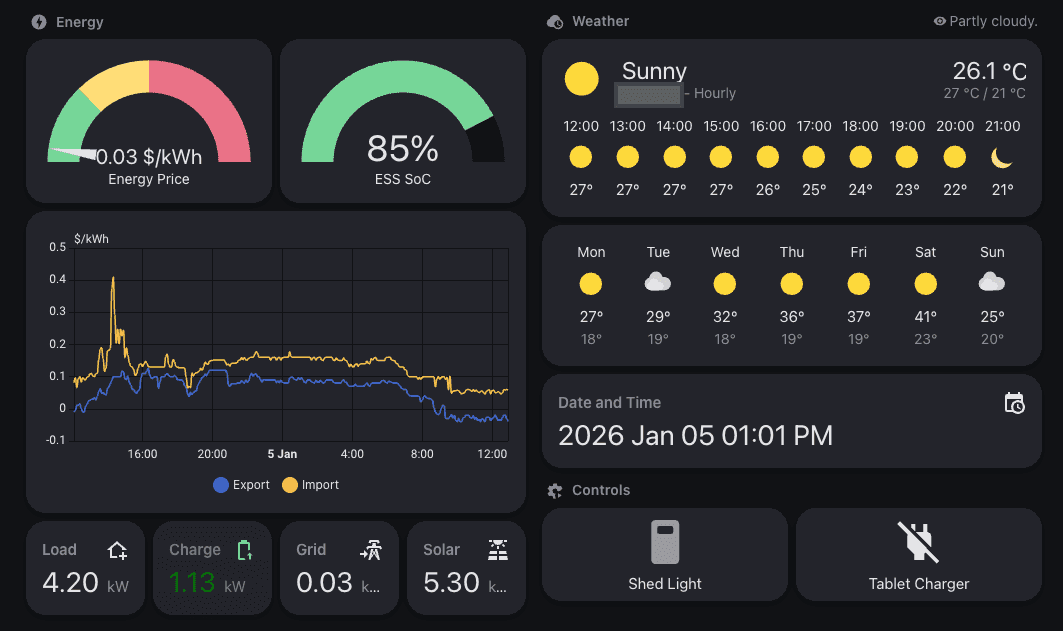
Hardware
Cheap Android Tablet
The only additional piece of hardware I needed was a cheap Android Tablet. I used the ALLDOCUBE iPlay60 Mini Tablet 8.68’ 64GB from AliExpress which cost about $AUD 120. It came with Android 15 (I recommened getting a tablet with later version of Android for being able to run it for few years with security updates).
You will also need some wall mounting hardware to mount it on a wall.
WiFi Smart Plug (Optional)
This WiFi Smart Plug is used to periodically turn off tablet charger to lessen the battery degradation due to constanly being plugged-in and remaining at 100%. You can use any WiFi smart plug which has an integration with Home Assistant. I used a Tuya branded one from Aliexpress.
Software
Fully Kiosk Browser
Although you could display a static url on chrome; I wanted a solution where the Tablet could be locked down to just the Home Assistant dashboard. This is where Fully Kiosk Browser comes in handy. This allows you to have quite tight control over what can be done with the Dashboard Tablet. It also has a built-in integration for Home Assistant, which allows you to monitor the state of the Tablet itself. This comes in quite handy for charging tablet battery which I will discuss later.
Home Assistant
Home Assistant runs on our home lab server as a KVM virtual machine. This is the same server which hosts a microk8s cluster, among other things.
The Home Assistant KVM virtual machine was created with following command. KVM image was already downloaded locally. It imports an existing QCOW2 disk image of Home Assistant OS and creates a headless (no GUI) VM that boots using UEFI, connected to a bridged network. The bridged network allows Home Assistance instance to be accessible externally via it’s own IP which is important for everything to function properly.
sudo virt-install \
  --name haos \
  --description "Home Assistant OS" \
  --os-variant=generic \
  --virt-type kvm \
  --ram=2048 \
  --vcpus=1 \
  --network bridge=br0,model=virtio \
  --disk /home/francois/home-assistant/haos_ova-16.0.qcow2,bus=scsi \
  --controller type=scsi,model=virtio-scsi \
  --import \
  --graphics none \
  --boot uefi
Main Home Assistant Integrations (used to supply data to the dasboard)
The data required for builtin the dasboard are supplied by following integrations.
Amber Price
Amber Electric is my energy retailer and they provide a price forecast when developer mode is enabled in the Amber portal. This integration allows you to consume this price feed and use it in your dashboards.
FoxESS
I have FoxESS EQ4800 series solar battery with a KH hybrid inverter. This integration allows me to monitor all aspects of aggregate energy generation and consumption in the house.
This integration needs to be installed via HACS and I have used a slightly modified version due to daily FoxESS API rate limits. This integration has been modfied to reduce the number of API calls so that it can work alongside Amber, as Amber itself consumes a large chunk of the available API call limit for control. The original integration is here.
Australian Weather
This is another HACS based integration which provides detailed Weather data for Australian locations. All the weather data displayed in the dashboard comes via this integration.
Setting up the main Dashboad
Energy Price Gauge
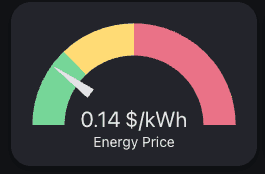
This gauge shows the import energy price with some predefined color segments to visualise the price. As can be seen below the 0 to 0.18 price segment will be in green, 0.18 to 0.35 segment in yellow, prices above 0.35 will be in red segment.
cards:
  - type: gauge
    entity: sensor.home_general_price
    name: Energy Price
    max: 0.7
    needle: true
    severity:
      green: 0
      yellow: 0.18
      red: 0.35
Battery State of Charge Gauge
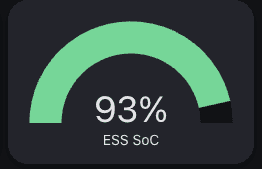
This gauge shows the battery SoC as a partially filled gauge with fill color dependent on percentage.
cards:
    - type: gauge
      entity: sensor.foxess_bat_soc
      name: ESS SoC
      max: 100
      needle: false
      severity:
        green: 50
        yellow: 20
        red: 0
Current Power Status cards
This is a horizontal stack of cards which displays the grid import/export power, battery charge/discharge power, solar power. We also use card-mod to slowly blink battery charge or discharge cards.
- type: horizontal-stack
  cards:
    - type: entity
      entity: sensor.foxess_load_power
      state_color: true
      name: Load
      icon: mdi:home-plus-outline
    - type: entity
      entity: sensor.foxess_bat_charge_power
      state_color: true
      name: Charge
      icon: mdi:battery-arrow-up-outline
      visibility:
        - condition: numeric_state
          entity: sensor.foxess_bat_charge_power
          above: 0
      card_mod:
        style: |
          :host {
            --card-mod-icon-color: lightgreen;
          }
          ha-card {
            animation: blink 5s linear infinite;
            color: green;
          }
          @keyframes blink {
            50% { opacity: 0.4; }
          }
    - type: entity
      entity: sensor.foxess_bat_discharge_power
      state_color: true
      name: Discharge
      icon: mdi:battery-arrow-down-outline
      visibility:
        - condition: numeric_state
          entity: sensor.foxess_bat_discharge_power
          above: 0
      card_mod:
        style: |
          :host {
            --card-mod-icon-color: yellow;
          }
          ha-card {
            animation: blink 5s linear infinite;
            color: lightyellow;
          }
          @keyframes blink {
            50% { opacity: 0.4; }
          }
    - type: entity
      entity: sensor.foxess_grid_consumption_power
      state_color: true
      name: Grid
      icon: mdi:transmission-tower-import
      visibility:
        - condition: numeric_state
          entity: sensor.foxess_grid_consumption_power
          above: -1
    - type: entity
      entity: sensor.foxess_solar_power
      state_color: true
      name: Solar
      icon: mdi:solar-power-variant
      visibility:
        - condition: numeric_state
          entity: sensor.foxess_solar_power
          above: 0

Written by Francois Fernando, a software craftsman and tinkerer.